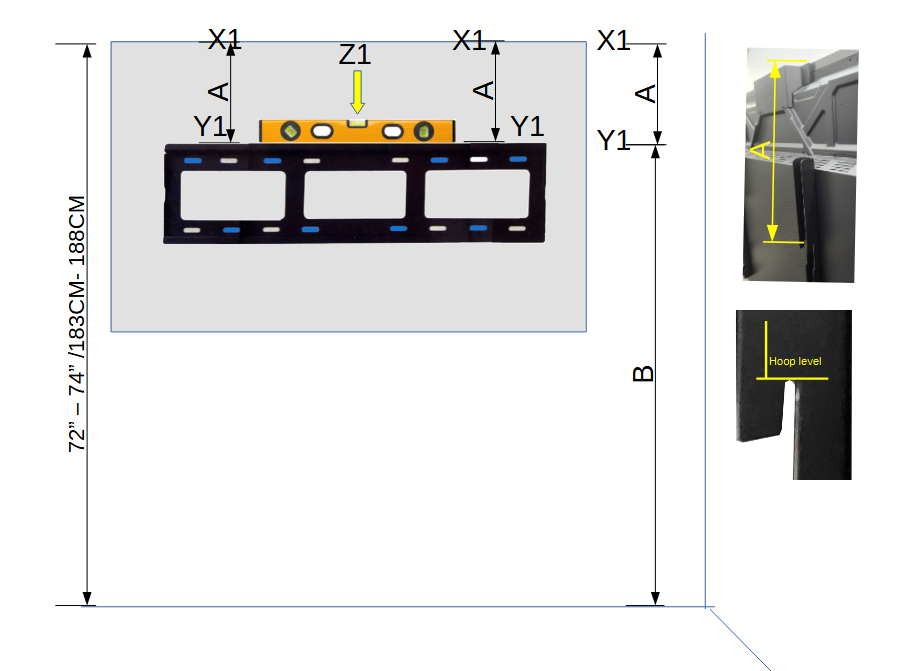
Measure the Height (A): Measure the distance from the hook level to the top of the panel. Record this measurement in centimeters (cm) or inches (in) as A.
Mark the Panel’s Top Position (X1): Mark the two highest points where the top of the panel should be positioned. This should be within the height range of 72” to 74” (183 cm to 188 cm). Label this as X1.
Determine the Mounting Line (Y1): Subtract measurement A from X1 to determine the correct height for the wall mount bracket. Mark two points at this height and label them as Y1.
Find the Center (Z1): Measure the width of the panel and identify the center point. Mark this as Z1 on the wall.
Position the Wall Mount Bracket: Place the wall mount bracket plate on the wall, aligning it horizontally with Y1 and centered with Z1. Use a leveler to ensure the bracket is perfectly leveled.
Mark the Drill Holes: Once the bracket is properly aligned and leveled, mark the positions of the drill holes using a blue marker.
Drill the Wall: Drill holes at the marked positions.
Mount the Bracket Plate: Screw the wall mount bracket plate securely into the wall. Double-check that it is level using the leveler.
Mount the Panel: With the help of 1–2 people, carefully lift and hook the panel onto the mounted bracket plate.
Connect the Modules: Plug in the computer module. Plug in the wireless module.
Power Up the Panel: Connect the power cord and turn on the panel. Complete On-Screen Setup: Follow the on-screen instructions to complete the initial setup process step-by-step.
Langkah-langkah Pemasangan Panel
Langkah-langkah Pemasangan Panel:
Sukat Ketinggian (A):
Ukur jarak dari paras cangkuk ke bahagian atas panel. Catat ukuran ini dalam sentimeter (cm) atau inci (in) sebagai A.
Tandakan Kedudukan Atas Panel (X1):
Tandakan dua titik tertinggi di mana bahagian atas panel sepatutnya diletakkan. Ini harus berada dalam julat ketinggian 72” hingga 74” (183 cm hingga 188 cm). Labelkan sebagai X1.
Tentukan Garisan Pemasangan (Y1):
Tolak ukuran A daripada X1 untuk menentukan ketinggian yang betul bagi plat pendakap dinding. Tandakan dua titik pada ketinggian ini dan labelkan sebagai Y1.
Cari Titik Tengah (Z1):
Ukur lebar panel dan kenal pasti titik tengahnya. Tandakan ini sebagai Z1 pada dinding.
Letakkan Plat Pendakap Dinding:
Letakkan plat pendakap dinding secara mendatar selaras dengan Y1 dan sejajarkan dengan Z1. Gunakan alat penimbang aras (leveler) untuk memastikan pendakap dalam keadaan betul-betul rata.
Tandakan Lubang Gerudi:
Setelah pendakap diletakkan dengan betul dan diratakan, tandakan kedudukan lubang gerudi menggunakan penanda biru.
Gerudi Dinding:
Gerudi lubang pada kedudukan yang telah ditandakan.
Pasang Plat Pendakap:
Skru plat pendakap dinding dengan kukuh ke dinding. Periksa semula kerataan menggunakan alat penimbang aras.
Pasang Panel:
Dengan bantuan 1–2 orang, angkat dan gantung panel dengan berhati-hati pada plat pendakap yang telah dipasang.
Sambungkan Modul:
Pasang modul komputer.
Pasang modul tanpa wayar.
Hidupkan Panel:
Sambungkan kabel kuasa dan hidupkan panel.
Lengkapkan settings di Skrin:
Ikuti arahan di skrin untuk melengkapkan proses tetapan awal langkah demi langkah.